An interlocking concrete paver patio represents one of the most rewarding outdoor architectural investments a American homeowner can build. Beyond expanding functional outdoor living space for dining, cooking, and entertaining, a professionally constructed paver patio dramatically elevates property value and aesthetic harmony. However, the true beauty and longevity of a paver installation lie hidden beneath its surface. While homeowners frequently focus their attention on paver styles, colors, and laying patterns, the structural integrity of the entire pavement system depends entirely on subgrade preparation, aggregate base compaction, bedding sand uniformity, and precision slope calculations. When a patio settles unevenly, develops unsightly puddles, or heaves during winter freeze-thaw cycles, the failure is almost never caused by defective paver units. Instead, it traces back to substandard base depth, inadequate soil compaction, using the wrong bedding material, or failing to establish a mandatory 2 percent drainage gradient away from residential foundations. Mastering hardscape engineering standards established by the Concrete Masonry and Hardscapes Association (CMHA) guarantees your outdoor living space remains stable, level, and puddle-free for decades.
The Physics of Flexible Pavements: Load Transfer and Subgrade Compaction
Interlocking concrete pavements are engineered as flexible pavement systems. Unlike rigid poured-in-place concrete slabs that resist loads through continuous tensile beam strength, a segmental paver patio absorbs and dissipates pedestrian and furniture weight through arching action and joint sand shear friction. When a localized load is placed onto a single paver, that load is transmitted downward and laterally across adjacent pavers through the tightly compacted joint sand matrix, effectively spreading the pressure across an expansive aggregate base.
For this load transfer mechanism to function without surface deformation, the native soil subgrade must provide an unyielding foundation. According to CMHA Tech Note PAV-TEC-010: Application Guide for Interlocking Concrete Pavements, the excavated soil subgrade must be mechanically compacted to at least 98 percent standard Proctor density (per ASTM D698) for pedestrian patios and walkways before any base stone is deposited. Failing to compact the native soil prior to adding aggregate base is the primary cause of differential settling and localized hollows.
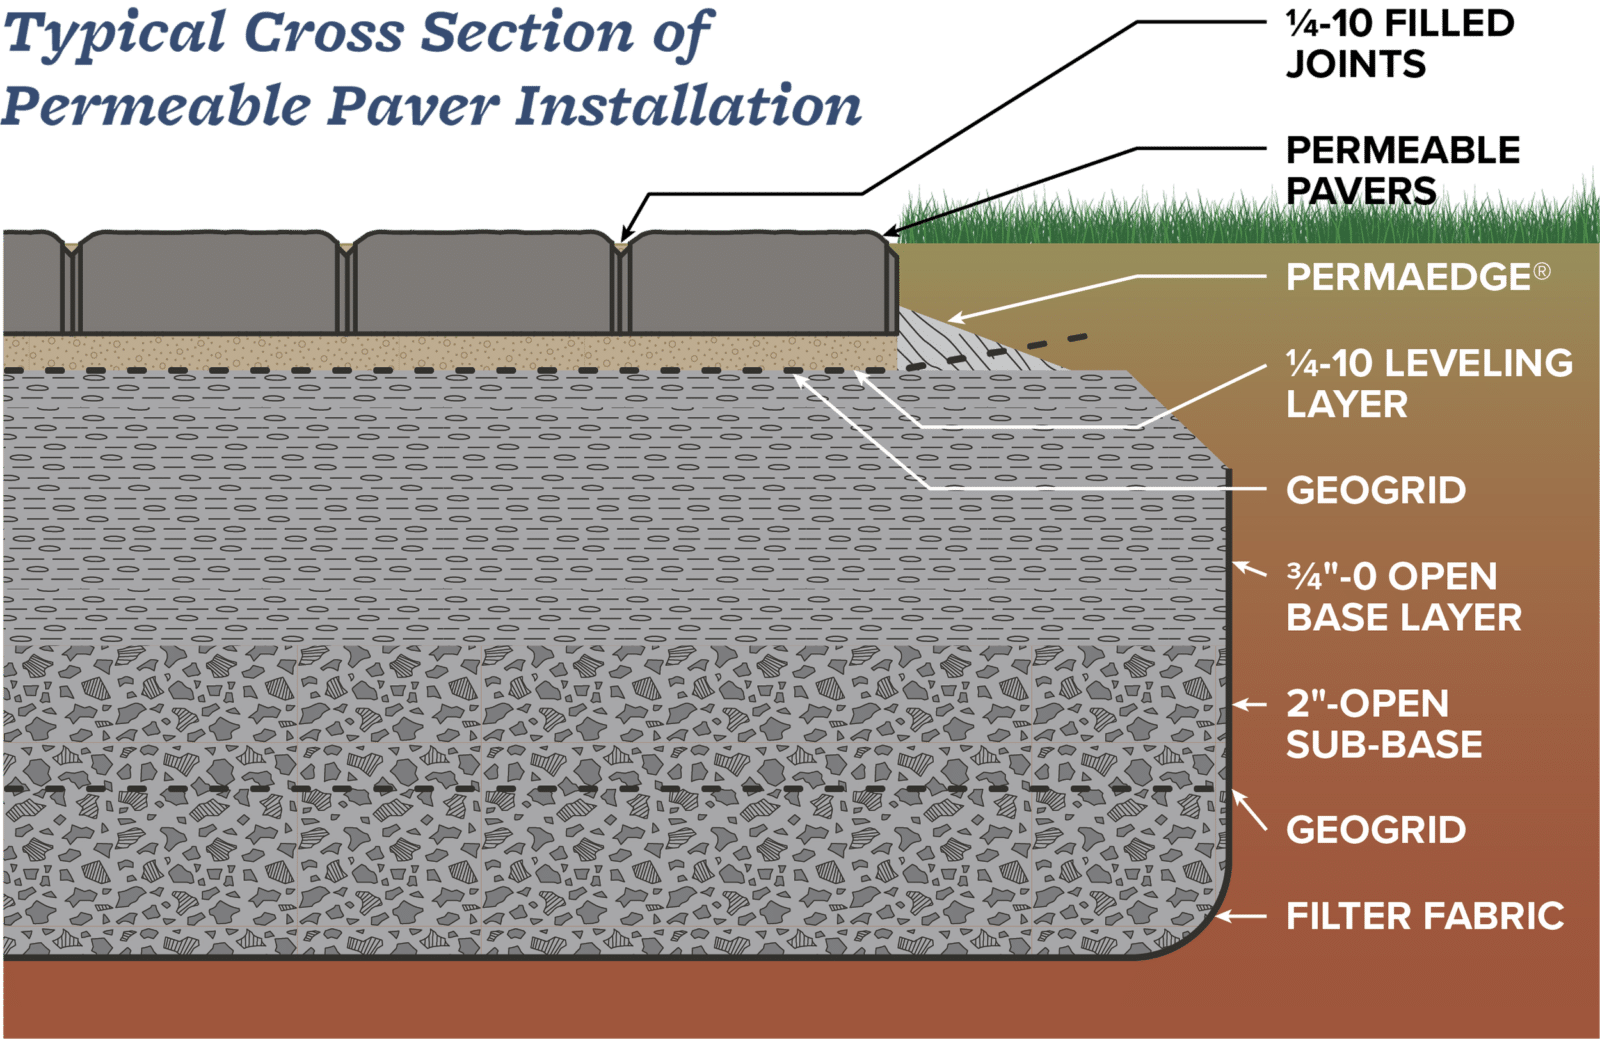
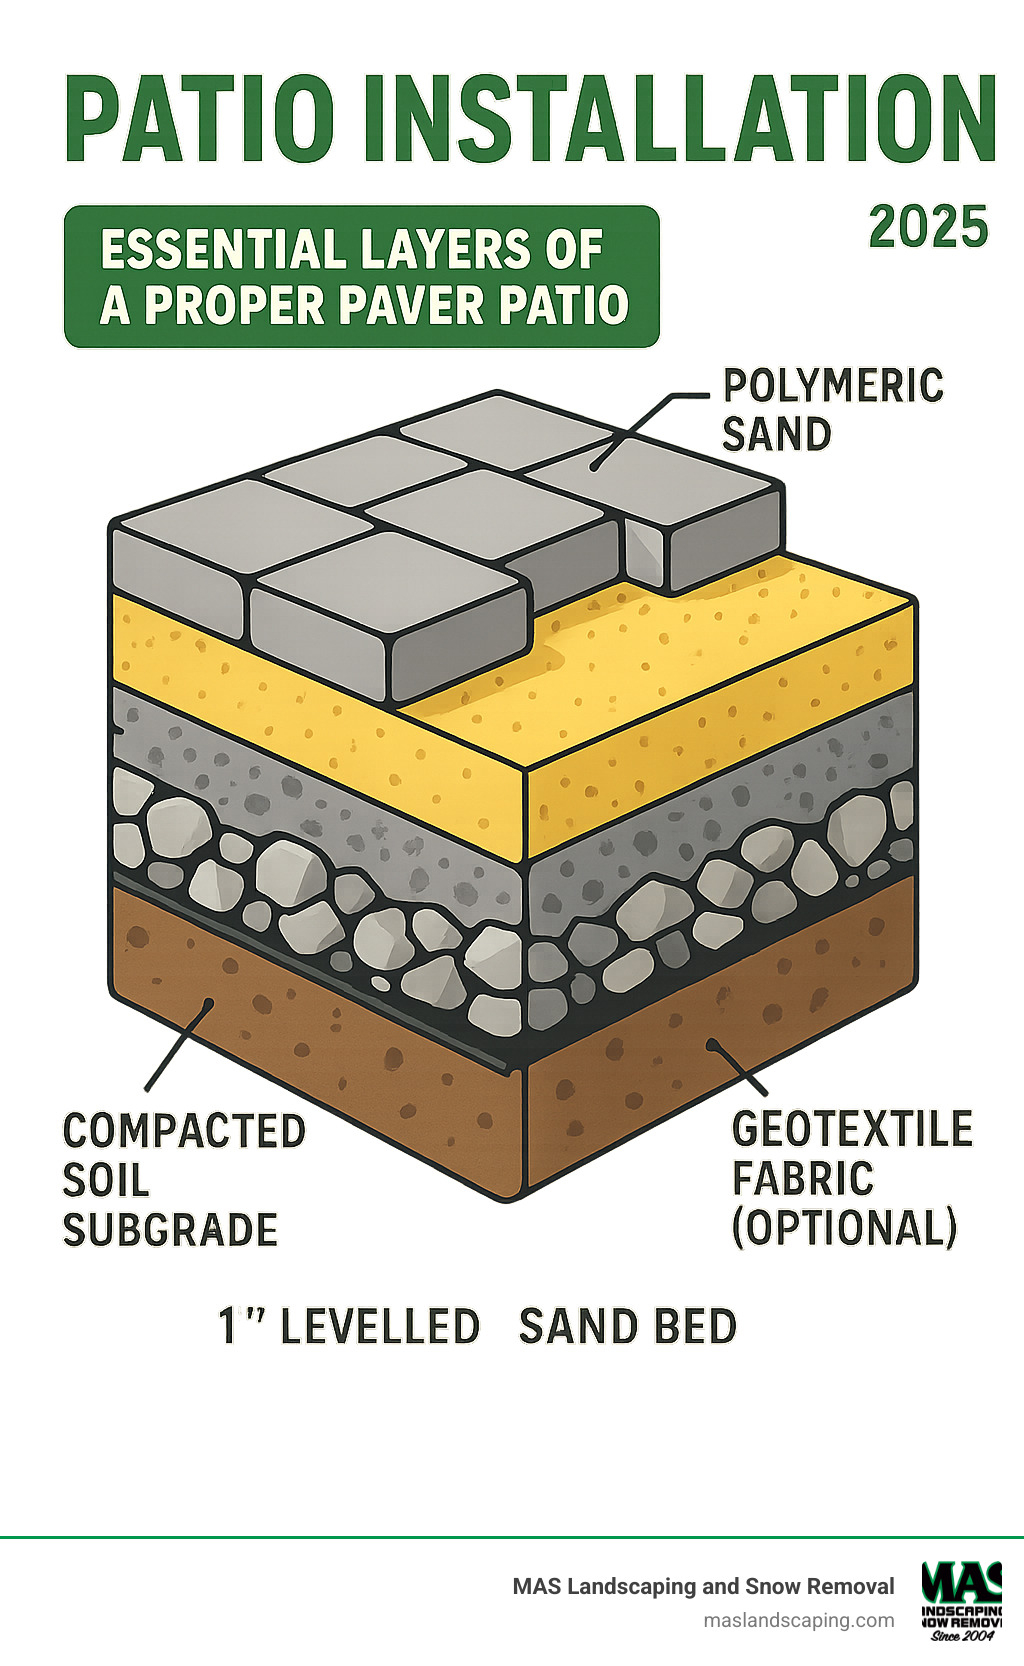
Furthermore, native soil types dictate base design. Dense cohesive soils (such as expansive clay common across the Southeast and Midwest) retain moisture and exhibit severe volume changes during freeze-thaw cycles. On clay subgrades, landscape architects mandate the installation of a woven or non-woven geotextile separation fabric (conforming to AASHTO M-288 standards) over the compacted subgrade. The geotextile prevents stone aggregate from migrating downward into soft subgrade soil while allowing excess subsurface moisture to drain freely.
Calculating Excavation and Base Depth: 4 to 6 Inches of Compacted Crushed Stone
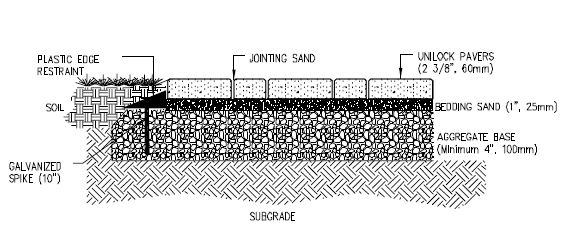
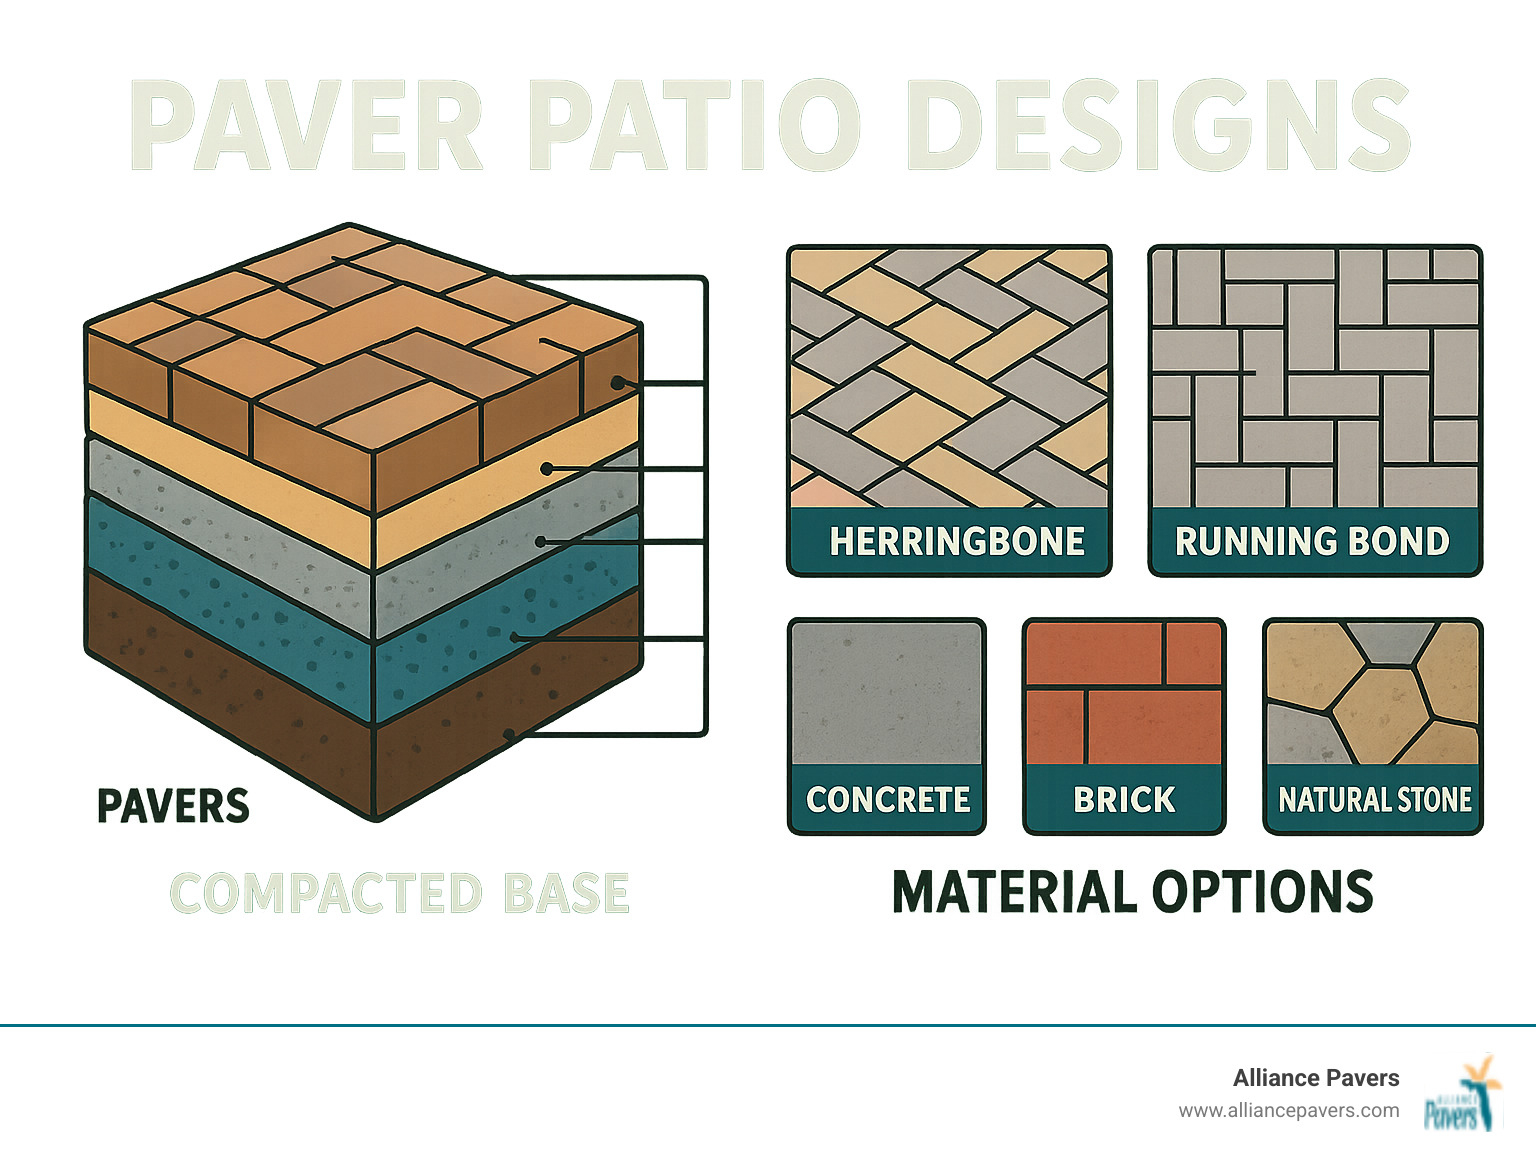
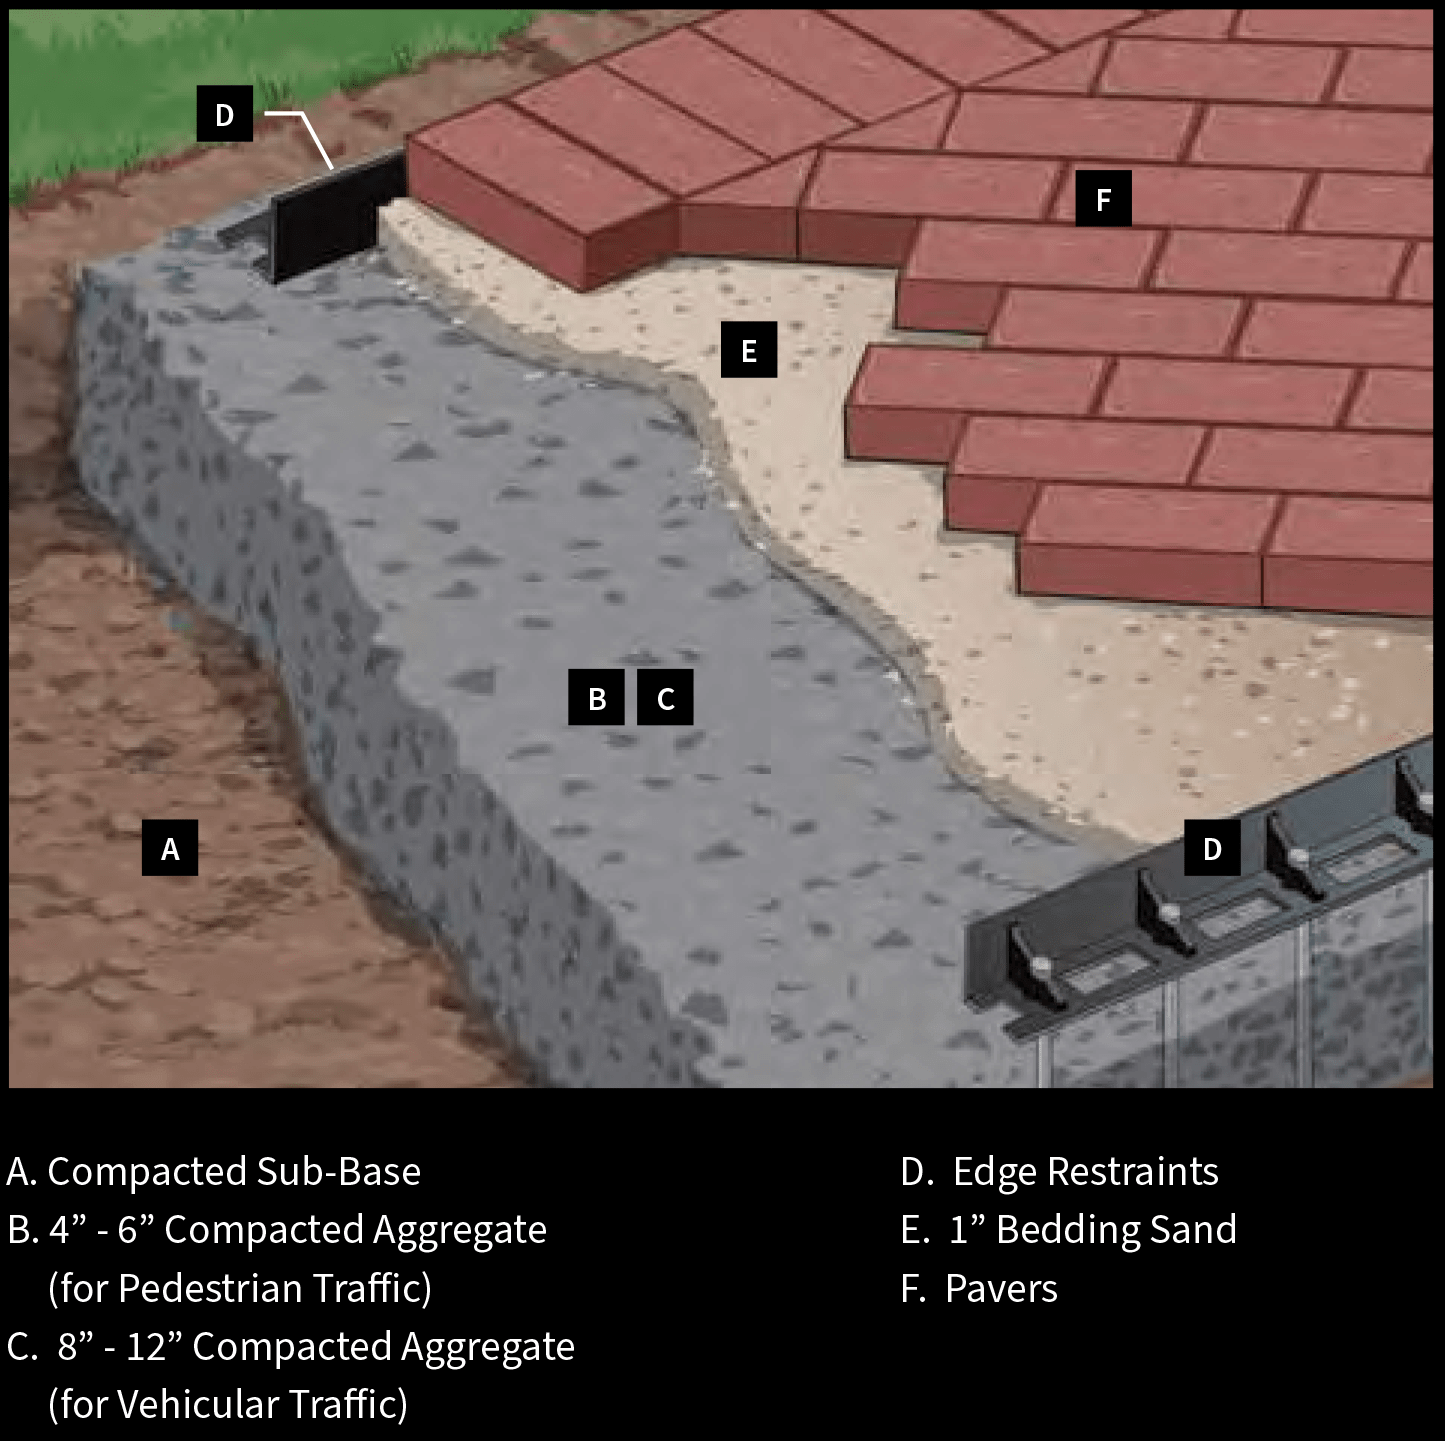
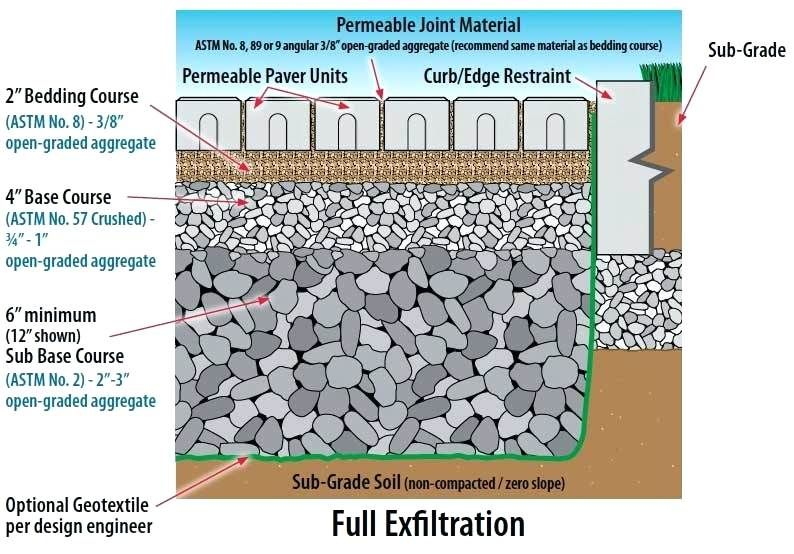
A durable patio installation requires excavating deep enough to accommodate four distinct vertical layers: compacted native subgrade, compacted crushed aggregate base, uncompacted bedding sand, and the concrete pavers themselves.
To determine total excavation depth for a standard residential pedestrian patio, calculate the sum of the system components:
- Compacted Aggregate Base Course: 4 to 6 inches (100mm to 150mm) of crushed stone. In well-drained, sandy soils and warm climates with no ground freezing, a 4-inch base is acceptable. In cold climates with deep frost lines or expansive clay soils, a minimum 6-inch base is mandatory. (For vehicular driveways, base depth increases to 8 to 12 inches).
- Bedding Sand Layer: Exactly 1 inch (25mm) of uncompacted coarse concrete sand.
- Paver Unit Thickness: Standard residential pedestrian pavers measure 2-3/8 inches (60mm) thick. Lightweight 1-3/4 inch (45mm) architectural slabs or patio stepping stones can be used for light pedestrian footpaths, but 60mm remains the heavy-duty residential standard.
- Total Excavation Depth: Adding these layers yields an excavation requirement of:
4″ to 6″ (Base) + 1″ (Bedding Sand) + 2-3/8″ (Pavers) – 3/8″ (Compaction Drop) = 7 to 9 inches total excavation depth.
When selecting aggregate base material, specify ASTM D2940 crushed stone, commonly sold as Dense Graded Aggregate (DGA), Crusher Run, ABC stone, or 21A/CR-6. This material combines sharp crushed stone ranging from 3/4-inch chunks down to rock fines. When vibrated with a commercial plate compactor in 2-inch to 3-inch lifts with light water misting, the particles interlock into a nearly impenetrable, stone-hard matrix with less than 2 percent void space. Never attempt to place the entire 6 inches of base stone in one pass; compacting lifts thicker than 3 to 4 inches leaves the lower aggregate uncompacted and prone to post-construction sinking.
The 2 Percent Slope Rule: Preventing Water Accumulation and Foundation Flooding
Paving materials should never sit perfectly flat. Rainwater pooling on top of a patio degrades joint sand, causes efflorescence staining, promotes slick moss growth, and creates treacherous ice patches during winter freezes. More dangerously, water pooling against a residential foundation can seep into basements, crawl spaces, and exterior sill plates.
To guarantee rapid, gravity-fed runoff, hardscape design standards mandate a minimum 2 percent surface slope away from the home or adjacent structures. As emphasized in the CMHA Homeowner Guide to Concrete Pavements, a 2 percent grade corresponds to 1/4 inch of vertical fall per linear foot of patio run (or 1 inch of fall for every 4 feet of horizontal distance).
To calculate the required total elevation drop across your patio:
Total Elevation Fall (Inches) = Patio Run (Feet) × 0.25 Inches
For example, if your patio extends 16 feet outward from the home foundation into the backyard, the total grade drop at the outer perimeter must be: 16 × 0.25 = 4.0 inches lower than the patio surface at the house wall. When managing broader property stormwater alongside patio installation, consider integrating smart drainage by reviewing our guide on winterizing rain barrels without creating downspout problems to direct roof runoff safely away from hardscaped living areas.
Crucially, this 2 percent slope must be established at the excavated soil subgrade and maintained through the aggregate base, not created by varying the bedding sand thickness. The bedding sand layer must remain a uniform, constant 1-inch blanket across the entire sloped profile.
Bedding Sand Specifications: Why Stone Dust and Mason Sand Fail
One of the most destructive hardscape blunders committed by inexperienced builders is using stone dust (limestone screenings) or masonry sand for the bedding layer beneath pavers.
The bedding layer must conform strictly to ASTM C33 washed concrete sand. Unlike rounded mason sand or fine stone dust, ASTM C33 sand consists of washed, angular, coarse silica particles with very specific sieve gradation (less than 1 percent passing the No. 200 sieve). The difference in material behavior is profound:
- Stone Dust Trap: Stone dust contains high concentrations of fine rock flour and clays. When exposed to rainwater percolating through paver joints, stone dust traps moisture against the base stone, creating a pasty, uncompactable mud. In freezing conditions, this trapped water expands, creating severe frost heave that breaks paver joint lines. Under heavy rain, stone dust slowly washes away into base voids, leaving empty pockets that cause pavers to drop.
- Mason Sand Sinking: Mason sand features fine, rounded, uniform granules engineered for mortar workability. Because the grains are rounded, they slide past each other under weight, creating shifting paver surfaces under foot traffic.
- ASTM C33 Concrete Sand Performance: Coarse concrete sand is angular and free-draining. When the pavers are laid over 1 inch of screeded concrete sand and vibrated with a plate compactor, the angular sand particles lock into the bottom chamfers of the pavers and create a rigid, stable bearing surface while permitting subsurface moisture to drain away freely.
Never screed bedding sand thicker than 1 to 1-1/4 inches. An overly thick sand bed will displace under foot traffic, causing pavers to wobble and cup.
Edge Restraints and Base Overlap: Preventing Lateral Spreading
Because pavers sit on an uncompacted sand bed and are held together by friction, horizontal thrust from foot traffic and thermal expansion naturally pushes pavers outward at the perimeter. If perimeter pavers shift even 1/4 inch, the joint sand between all adjacent pavers empties out, collapsing the interlocking structure.
To eliminate lateral spreading, every paver patio requires heavy-duty edge restraints:
- Rigid Commercial Edge Restraints: Install commercial L-shaped heavy-gauge plastic (such as Snap-Edge or Pave Edge) or aluminum edge restraints along all open patio borders. The vertical lip rests tight against the paver side, while the horizontal base plate sits on the aggregate foundation.
- Spike Sizing and Spacing: Fasten the edge restraint into the compacted aggregate base using 10-inch or 12-inch long, 3/8-inch diameter smooth steel landscaping spikes. Spikes must be driven every 12 to 18 inches on straight runs, and every 6 to 12 inches along curved perimeters.
- The 6-Inch Base Overlap Rule: Edge restraint spikes must bite deeply into compacted stone, not soft garden soil. Hardscape engineering standards require that your compacted aggregate base course must extend at least 6 inches beyond the outer edge of the paver perimeter. If a patio measures 16 feet wide, the excavated base trench must be excavated and compacted 17 feet wide (6 inches of base extension on both sides). Spiking edge restraints into loose perimeter topsoil will result in complete edge blowout within a single season.
When planning perimeter borders and transition paths, coordinate landscape infrastructure early; if you plan to install low-voltage garden illumination along patio steps and borders, calculate circuits beforehand following our formulas for low-voltage landscape lighting wire size and transformer sizing to bury conduit under the base stone before compaction.
Joint Sand Stabilization: Polymeric Sand and Final Compaction Sequence
The final installation phase activates the flexible pavement interlock:
- Initial Paver Compaction: Once pavers are laid in their specified pattern (such as a 45-degree herringbone or running bond), run a low-amplitude plate compactor (generating 5,000 lbf at 75 to 100 Hz) over the dry, un-sanded paver surface. Use a protective polyurethane compactor pad on the compactor plate to prevent scratching stone faces. This initial pass seats the pavers approximately 3/8 inch into the ASTM C33 bedding sand, forcing sand upward into the lower joint cavities.
- Polymeric Sand Application: Sweep high-performance polymeric joint sand across the completely dry paver surface. Polymeric sand blends graded silica sand with organic polymer binders that activate upon light water misting, forming a durable, elastic joint that flexes with temperature swings while blocking weed growth and ant burrowing.
- Vibratory Joint Compaction: Run the plate compactor across the patio a second time with joint sand on the surface. Vibration forces the sand deep into the bottom of every joint cavity. Sweep additional sand and vibrate until all joints are filled flush to 1/8 inch below the paver chamfer edge.
- Precision Misting Activation: Thoroughly blow off all residual sand dust from paver surfaces with a leaf blower. Using a garden hose nozzle set to a gentle shower spray, mist the patio in three consecutive light applications spaced 5 minutes apart to activate polymers without washing sand out of the joints. Keep all foot traffic off the patio for 24 to 48 hours while the polymers cure into a flexible, weather-resistant barrier.
If your patio borders young plantings or newly established shade trees, take care to safeguard vulnerable root zones and bark during heavy hardscape construction by reviewing our seasonal guide to protecting young trees from winter damage.
By enforcing a true 2 percent drainage slope, excavating for a 6-inch compacted ASTM D2940 aggregate base, insisting on washed ASTM C33 concrete bedding sand, and extending base stone 6 inches beyond spiked edge restraints, you ensure your interlocking paver patio remains an enduring architectural triumph that enhances your outdoor living experience for a lifetime.