A left-hand lever sounds like a simple purchase until two people describe the same door from opposite sides. Add an inward or outward swing, a curved handle, and a product page with several functions, and an attractive replacement can become an uncertain order. The useful starting point is not a guess at LH or RH. It is a clear description of the existing opening and the exact hardware you intend to buy.
This guide is for US homeowners comparing replacement residential door levers. It separates observation from the manufacturer’s ordering convention. It does not cover changing a door’s swing, altering a rated assembly, or deciding whether an opening complies with local requirements.
Separate the door’s movement from the lever’s ordering label
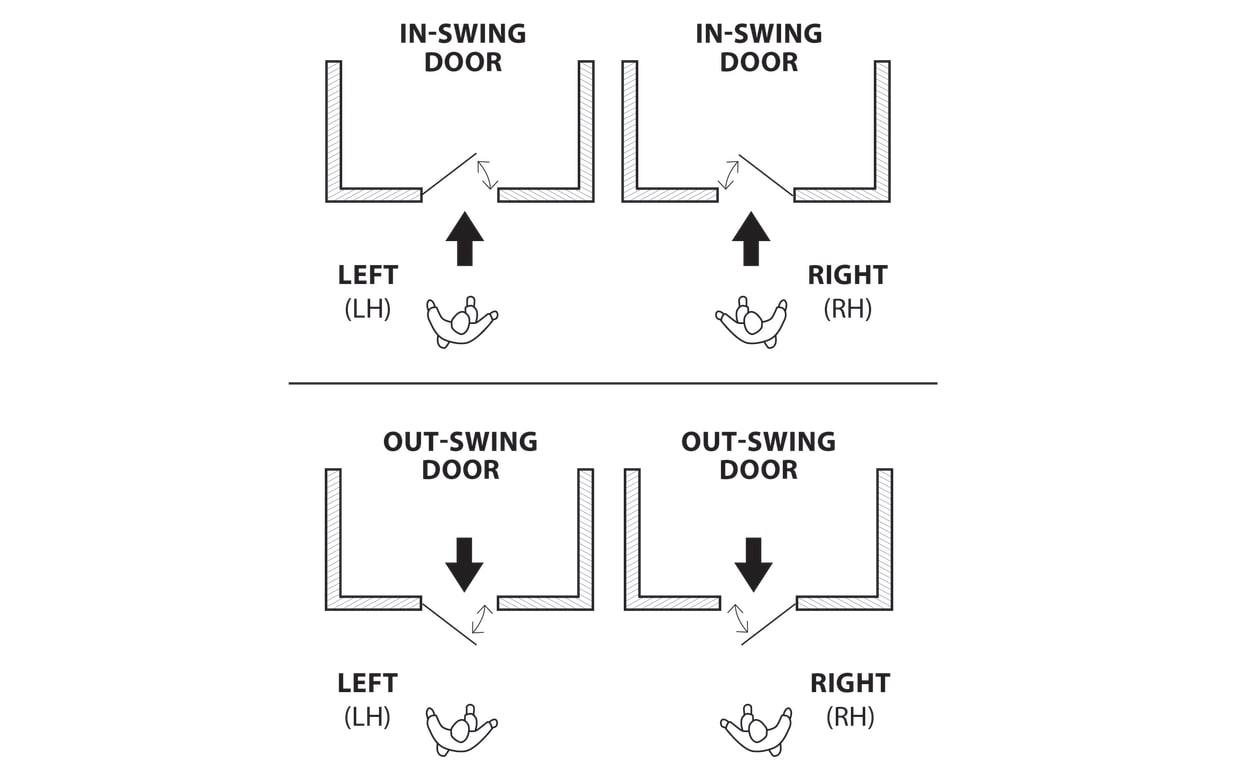
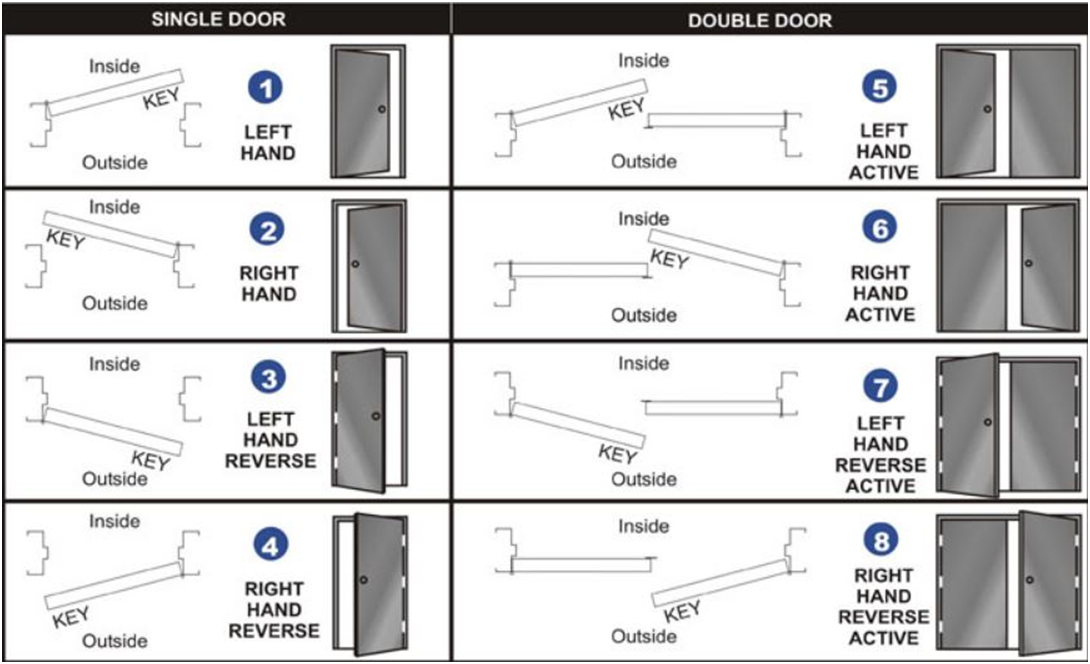
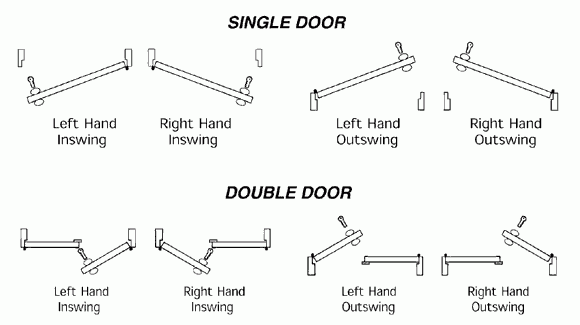
Door swing and hardware handing are related, but they are not interchangeable instructions. Masonite describes an exterior door that opens into the home as an inswing and one that you pull toward you to enter as an outswing. Record that movement independently of the left/right label.[2] Schlage specifically warns that determining handing for hardware differs from determining it for ordering and hanging doors.[1]
For your notes, use three separate fields: where you are standing, which side carries the hinges from that viewpoint, and where the open door moves. That description remains useful even if the retailer uses an unfamiliar abbreviation. If the product drawing and your notes seem to disagree, send the observations to the manufacturer rather than deciding that one diagram must be wrong.
Do not change your description halfway through the conversation. “Left as seen from the hallway” and “left as seen from inside the bedroom” are different observations. For an interior room, ask the manufacturer which side its instructions treat as the outside or reference side.
Photograph the opening before interpreting it
Take an overall photograph from each side of the closed door, then one showing the opening with the door partly open. Keep the original photographs rather than a mirrored selfie. Label them with the room or approach: porch, hall, bedroom, or closet. Add a small sketch showing a wall line, the hinge location, and an arrow for the opening movement.
Use this suggested observation list:
- The opening’s name and the viewpoint used in each photograph.
- The hinge side as seen from that named viewpoint.
- Whether the door moves toward or away from you when opened.
- Whether you are replacing one operating lever, a complete pair, or non-turning decorative hardware.
- The existing brand and model, if readable, with a photograph rather than a guessed identification.
These are notes for selecting hardware, not instructions to remove hinges or modify the door. If you are also considering the surrounding trim, our overview of door casing design addresses that separate visual choice. Keep the hardware compatibility decision tied to the actual product documentation.
Check whether the chosen lever needs a handing choice
Not every lever requires a separate left- or right-hand purchase. In Schlage’s residential guide, curved non-turning levers and certain handlesets with curved interior levers require attention to handing. Its passage, privacy, and keyed levers described there can be reversed, while straight designs such as Latitude have universal handing. These are manufacturer-specific examples, not a promise about every brand or model.[1]
Open the installation instructions for the exact item in your cart. Look for the function, model number, included components, and whether the instructions describe a reversible lever. A photograph of a similar handle is not enough. Save the relevant product page or document with your order notes so you can compare what was specified with what arrives.
Write down the unresolved question precisely: “Does this model need an LH or RH selection for this opening?” is easier to answer than “Will this handle fit?” If the answer depends on which side receives a particular component, mark that side on your photograph before seeking confirmation.
Check fit separately from direction
A correct handing label does not establish that the lock fits the existing preparation. Schlage defines backset as the distance from the door edge to the center of the cross-bore hole. Its terminology guide distinguishes that main hole in the face of the door from the latch bore in the edge. Those are separate features to compare with the replacement’s specifications.[3]
Build a second list for fit: door thickness, backset, the existing hole arrangement, and the dimensions required by the exact replacement. Record measurements in inches with the fractions intact. Do not round a measurement to whichever option happens to be available online. Where a dimension is inaccessible without disassembly, mark it unconfirmed and seek suitable help rather than estimating from a photograph.
Keep the two lists side by side. One answers “Which direction or configuration?” The other answers “Does this item fit this opening?” Neither is a substitute for reading the installation instructions, and neither establishes security performance or approval for a special door assembly.
Use a written confirmation for ambiguous orders
Here is a fictional example of a useful supplier message: “I am replacing the interior lever of this front entry handleset. Photo A is taken from the porch; photo B is from the hall. The door opens into the hall. Please confirm the compatible replacement part and handing using these photographs and the attached model label.” The example deliberately leaves out a guessed RH or LH answer.
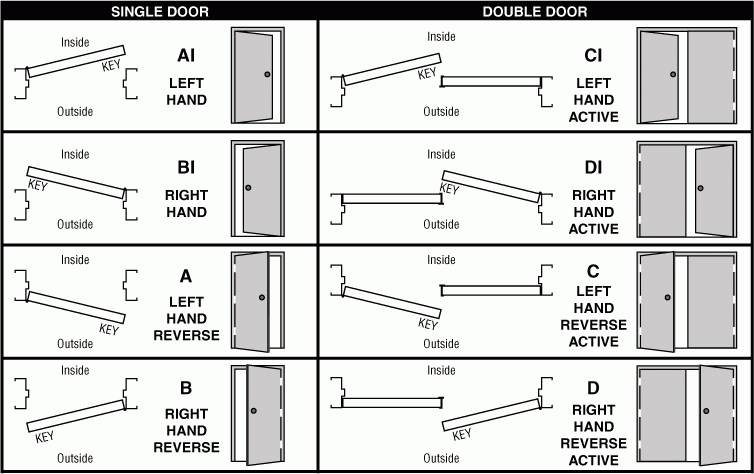
For two-leaf doors, make separate records for each leaf and each face receiving hardware. Do not assume that two identical-looking items are the required pair. Schlage notes that a door needing non-turning levers on both sides may require one of each handing.[1] Ask the supplier to confirm the complete quantity and configuration for your particular arrangement.
Before paying, compare the confirmed model, function, finish, handing choice, and included parts with the cart. Keep the reply and order together. If the delivered item differs, pause before installation and resolve the mismatch with the seller.
Finish with a clear specification, not a memorized rule
The aim is a replacement that has been identified from the opening, the existing hardware, and the manufacturer’s own instructions. A labeled photograph and a short, consistent description are more useful than a confident left/right answer without a viewpoint. Keep swing, handing, and fit as separate checks, and leave uncertain fields open until the supplier can confirm them.
Sources
- [1] How to understand lever and door handing.
- [2] Measuring for an exterior door
- [3] Parts of a door lock and door hardware terms defined.